
Exploring FLDigi
- Bill Hankins
- May 30, 2020
- 5 min read
Updated: May 30, 2020
The Topic for the 2nd weekly Hobbyist DigiNet is FLDigi, where we will explore much of what the program has to offer. This software is a must have!
Download and Install FlDigi for your Operating system from www.w1hkj.com
This tutorial will explain and explore much of FLDigi, however there is much more to the program than this tutorial will cover. I recommend exploring more of the program once you're done with this tutorial, especially the online documentation in the Help menu.

To start off let's breakdown the main screen. Rig Controls and Log Controls are on the top of the screen

The other windows operate the rest of the program's user interface

The File menu houses a few very useful functions. File-> Folders brings you to your active folders.

The FLDigi Config folder houses many folders including the images folder where you can retrieve your received images.

NBEMS FLMSG files can be found here
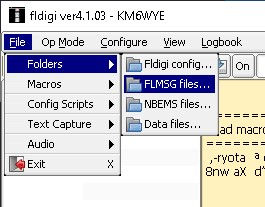
The MCARCS Digi Net Received ICS forms can be found in the ICS->Messages folder


Once we edit the Macros later we can save the new configuration to a file for simple configuring on other computers
File->Macros->Open/Save
Save or read FLDigis Configuration to or from a file
File->Config Scripts->Execute/Generate
Save all Received and Transmitted text to a text file
File->Text Capture->Log all RX/TX Text
The Text Capture File (textout.txt) is Located in Fldigis Talk Folder


FLDigi can Record all received and transmitted audio to wave files as well as playback recorded files as if it were happening live with a continuous repeat option. This is a great way to find out which modes people are using by recording a small section of their transmission, playing it back in a loop and going through the modes. Also the Signal Identification Wiki is a great resource for understanding what different modes and speeds look and sound like.
FLDigi Has many different modes and many different speeds and bandwidths available. Let's go over some of the more popular ones found on HF and VHF


CW Morse Code
Hell - Hellschreiber Commonly used on HF FSK Hell 105 (high duty cycle) - Feld Hell heard sometimes, has much lower duty cycle but doesnt get through the noise as well as FSK Hell 105
MFSK - Most common is MFSK32 -32 and MFSK-64. Support Image Transfer
MT63 MCARCS Digi Net uses MT63-200L which is not allowed on HF. On HF I've seen MT-63 500L rarely
Olivia (Sounds like Contestia which is a variation of Olivia) Great weak signal mode with lots of different speeds. Can be found on HF quite often. Olivia 8-500 and 4-500 are pretty common.
PSK - BPSK-31 great weak signal mode, one of the most popular keyboard to keyboard modes ever. Very common on HF. Also has Multi carrier options
8PSK - the fastest mode in FLDIGI but also not robust and requires a solid RF connection with finely tuned audio level settings. Legal on VHF and above only. 8PSK-500 is fast enough for most cases and decodes better than the faster 8PSK-1200F which is the fastest mode in FLDigi at 1200 bauds and a bitrate of 3600 bits per second.
PSKR same as PSK but with Forward Error Correction and also has multi carrier options
RTTY - a very commonly found mode on HF and very identifiable by ear. the bandwidth can be visually matched on the waterfall.

Olivia, Contestia, and RTTY have custom settings including bandwidth control
Once we've Selected a mode from the OpMode menu a quick way to navigate the different baud rates within that mode can be found at the bottom left side of the FLDigi screen.

Click on the button that displays your current mode and a list of speeds within that mode pops up.
FlDigi's Configure menu is pretty much a shortcut to the different tabs within the FLDigi configuration window. Open the FLDigi Configuration window. Configure->UI->Colors & Fonts

The upper row of tabs are the main tabs. The SubTabs are options within that main tab. The Sub-SubTabs are more options within the SubTab category

The Main Tabs (Relevant ones):
*Operator Tab is for information about you (make sure you fill this out with your info)
*Waterfall Tab - change waterfall look feel and other settings
*Modems tab - settings for the different OpModes
*Rig tab is for Cat control of your radio
*Audio tab - Setup Soundcard in and out
*ID tab - RxID/TxID, pretone, CW Postamble, and Video ID settings which is Text in the waterfall. Usually people use their callsign or mode but can be anything you want it to be
*Misc Tab - CPU/NBEMS(FLMSG)/Spotting
*Web Tab - Logging Setup
*Autostart - Start other programs when FLDigi Opens

To Configure FLMSG for NBEMS go to the MISC Main tab and the NBEMS subtab and locate the FLMSG exe file
Don't forget to Click the save button at the bottom when finished with FLDigi's Configuration
The View menu has some windows you can play with. I usually put my Rig/Log Controls to Partial so i have more room on the screen

View->View/Hide 48 Macros will reveal all available macro buttons and place them at the top of your screen below the Rig/Log Controls window.


The Logbook menu is pretty comprehensive and can connect to various online Logbooks

The Help Menu houses the Beginners Guide, Online Documentation, FlDigi website, a few other things to tinker with and don't forget to Check for Updates!
Now let's explore the buttons below the waterfall.

Buttons below the waterfall from Left to Right:
**[WF] Toggles between Waterfall, FFT, and Signal display modes
**Waterfall Visual Sensitivity range (Lower/Upper) 0-80 for me
** x1, x2, x4 zoom level button
**Slow, Norm, Fast = Waterfall Speed
**Active Listening Frequency
**[Lk] = Lock Center Transmit Frequency. Separates RX frequency from TX frequency when active and waterfall is clicked
**Rv = Reverse Signal Polarity. Useful if signal is transmitted in LSB but being decoded in USB. On Feld hell the Rv button makes the background black and text white so it is easier to read weak signals
**T/R = Switch from Transmit to Receive or from Receive to Transmit
** Lower Right - AFC Auto Frequency Control
- SQL Squelch enable button
- Squelch level bar
- Decode Signal Level
Now let's explore the Macro buttons. Right click one of the macro buttons to edit it's functions. Lets start with the TX>> button
Right click the TX >> button
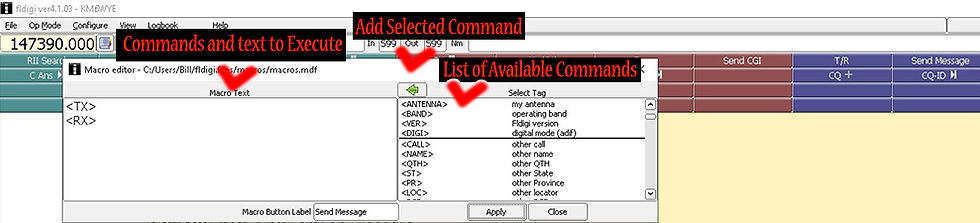
Left side is a List of commands and Text that the macro will execute. The Right side is a list of available commands and variables. The Green arrow above right window will add the selected command to the macro list on the left.
At the bottom is a label box and Apply/Cancel buttons
<TX> puts the radio into transmit mode and will transmit whatever text you've typed into the blue text input box when the macro button is pushed. To force FLDigi to put the radio back into receive mode when the text in the blue box is done being transmitted add the line <RX>
Label the macro button "Send Message" or something similar and click Apply
There are a ton of available commands to play around with and explore. A few of the ones i use regularly are:
<TX> Put radio into Transmit Mode
<RX> Put radio into Receive Mode
<WX> Print Online weather report in Blue input screen
<MODEM:> Switch OpMode modems
<IMAGE:> Send image from File
Here's an example of a Weather Macro that at one click of the Macro button, transmits updated weather text from station KUKI in MT63-2KL then switches modes to MFSK32 and sends a low resolution weather image that I had placed into a local folder earlier (There are ways to automate this process outside FLDigi).

Thanks for checking out this FLDigi tutorial. I hope this has helped familiarize you with this amazing piece of software, There is a lot more to explore but this should get you started. Feel free to drop a line if you have any question or comments. Have a great day!


Comments